Showing posts with label Recipe. Show all posts

Monday, July 12, 2010

Dehydrator Flax Seed Crackers


We genuinely try, in our home, to avoid sugar. Now I know this looks hypocrital considering the post of just a few days ago showing all the sugar for the bake sales. And truthfully, we are hypocrits. We do *try* to avoid sugar. But the irony of this is that I love to bake sweets. And people seem to really like my baking. Cake and cookies and various candies seem to bless people in ways differently than flax crackers do.

Don't ask me why.


I'm not saying that we don't eat the sweets that I make on occasion. Because that would be beyond hypocritical. And a lie. But...as a general rule, I'm really blessed by a family that likes more nourishing foods as a general rule.


So even though I can dip Nutter Butters in white chocolate bark with the best of them, the flax crackers are something I make much more often. I just don't photo them as much because they're not half as cute.


**Recipe written below pictures.


This is the flax seed before it's ground. I grind it in a coffee grinder designated for stuff like this.
And this is what it looks like after about 20 seconds. I use 2 cups of whole flax seed for this recipe. My grinder is small so I have to do it 1/2 cup at a time.
I use my Blendtec blender for this recipe, but you could maybe use any quality blender if you chopped the foods a little smaller. Here I have one can of diced tomatoes and half of a medium/large onion. I then add about 1/2 cup Braggs. You could certainly substitute soy sauce I'm sure.
Here I've added about half a cup of extra virgin olive oil and a LOT of garlic. I buy it prechopped in those huge containers at Sams and I probably used 5 or so Tablespoons. I also added about a cup of water. And a whole jalapeno from the garden.
Here is 2 big handfulls of raw, organic spinach and a handful of shredded cheddar cheese. I also added about a heaping tablespoon of coarse ground pepper.
Here it is blended.
Now most of the flax cracker recipes that I've seen say to add the water to the ground flax first. I have issues with this. It "gels" and then I have a really tough time incorporating the blended vegetables. YMMV.
When you first add it to this smallish amount of ground flax, it seems awfully thin. You're gonna want to add less of the liquid vegetables. Don't. Because as you can see in the photo below...
...it thickens up. Here I'm spreading it on my Excalibur Dehydrator paraflexx sheet. One batch of flax paste makes 4 full sheets of crackers. Approximately 200 crackers.
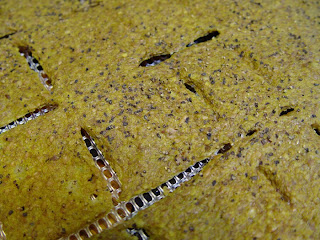
I spread it as thin as I can get it to go which varies depending on how thick the concoction has become. The thinner pieces have a texture more like chips. The thicker pieces, more like crackers. It's a win/win. And then I score the paste to make it easier to break into bite sized pieces when it's dry.
I then barely salt and heavily pepper the paste and pop it in the dehydrator for a couple of days at 115 degrees. After several hours, asap, I remove the crackers from the paraflexx sheets to dry them evenly on both sides.


And this is what they look like when they're done. I literally cannot keep enough of these made to satisfy everyone here. I usually make a batch ever single day. They are really very, very good. And spicy.

Dehydrator Olive Oil and Black Pepper Flax Crackers

2 Cups whole flax seed, ground
1 can diced tomatoes
1/2 large onion
1 whole jalapeno pepper with seeds (optional)
1/2 cup Braggs liquid aminos (could probably substitute soy sauce)
Lots of garlic, I use appr. 5 tablespoons diced (to taste)
1 cup shredded cheddar cheese
1-2 tablespoons of coarse black pepper
1/2 cup olive oil
2 handfulls raw spinach

Grind flax seed and put in a large bowl. Set aside. Add other ingredients to a good blender (or possibly a food processor but realize that the mixture will be moderately thin and may leak) and process until it's all liquid. Pour over flax meal and mix well. Spread thinly on dehydrator sheets (I set my dehydrator at 115 degrees)and very lightly salt and pepper (to taste) and dehydrate for several hours. As soon as possible, peel the sheets off the crackers and continue to dry for 48 or so hours total.


This is a tease of my homemade protein bars. When I make them again I'll try to get some pictures and post a recipe.

Read More...

Thursday, May 22, 2008

Quinoa (Protein) "Cookies"

I *so* swiped this recipe from:

Green Smoothie Girl.

But as usual, I have some compulsive urge to change things around. So here's what I did.


I ground Quinoa in my BlendTec to get a cup of Quinoa flour.


Then, because I didn't have any ground, I ground some wheat in my BlendTec to get a cup of wheat flour. This is both the quinoa flour and the wheat flour in the bowl.

Then my battery in my camera died, so I didn't get to show the added:

1/2 cup coconut oil
T Baking Powder
t Vanilla
1 L Egg
1/4 cup Agava
1 cup Rolled Oats
1 t cinnamon
1/2 cup raisins


But I promise I added it. And my camera battery was just charged enough to make a picture of the mixed dough.


I charged the camera again while I was putting the cookies on the pan to bake. Just so I could get this picture for you.


And here is what they look like once they're baked. (I eyed the coconut oil instead of measuring it and think I added a little too much as they spread out more than normal, but it didn't seem to change the taste.)


And here is the PROOF that they are delicious. My P I C K Y redhead likes them. (Excuse the 80's hair and makeup, she just got back from a dress rehearsal for a play she's in tonight!)

These are something that I feel good about giving my family. If you try them, let me know!

Read More...

Tuesday, March 25, 2008

Homemade Frugal Delicious Stovetop Granola


My family loves granola. But granola is *expensive*. And it usually has some pretty weird ingredients. So I decided to learn to make my own. I found several recipes (this being the best one in my opinion), but as is par for the course here, I tend to combine them and make my own recipe out of it.

This recipe is, bar none, the best granola we've ever had. It makes a HUGE amount. But can be easily divided.

To make it more frugal, use what you have on hand or what is inexpensive or in season.

Printable recipe follows picture tutorial.


Heat 4 tablespoons of Olive Oil up in a HUGE pan.


When the oil is hot (medium high) add 8 cups of oats and a bag of coconut. Here I added a little bag because my sweet husband picked it up for me on the way home and paid a FORTUNE for it. If I'd had a cheaper bag, I would have added more.


Brown the oats and coconut in the skillet stirring constantly. It takes several minutes to get them good and toasty looking. Then pour this into a bow.


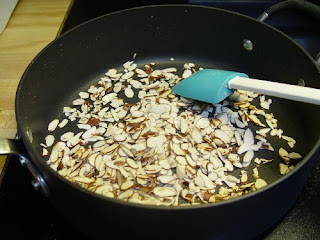
Heat a little more oil and add 1 cup of sliced almonds. Stir until they are toasted. You can also do this in the oven or even skip this step. But toasted almonds have a lot more flavor than untoasted almonds. When toasted put them aside.


In the same skillet melt 1 and 1/3 cups of butter.


Add 8 Tablespoons of honey.


And 1 1/3 cups of packed brown sugar. Stir constantly until it comes to a good bubble.


Then add back in your toasted oats and coconuts (not your almonds yet).


Now brown this mixture for several minutes. It gets all caramely and toasty. You'll know when it's done.


Have some parchment or waxed paper ready.


Dump the hot toasty mixture on the parchment or wax paper. Pack it together so that you have chunks instead of crumbles. With the toasted almonds spread on top and packed down.


I like to add another kind of nut just to keep it interesting. Here is about 1/2 cup chopped pecans. All the recipes say to wait until it's totally cool and bagged to add the nuts and fruit, I have no idea why. I add them right after I pack it down on the parchment paper.


Here I am packing the pecans into the granola mixture.


Add some dried fruit. Here is close to a cup of dried cranberries. And I don't show it (forgot to get the picture) but I also added half a cup or so of dried dates just cause I had them left from Christmas baking.


Pack the dried fruit down on the (still warm) granola mixture.


Once it's set for a while, start to break it up. If you wait until it's completely cool it may be harder to crumble. See the corner that's missing? That's where the family can't keep their little grubby fingers out of it. Yeah, it's that good.


Even after the family had eaten and eaten, we still had a huge gallon bag left that weighed right at 3 lbs.


Be sure not to put it in the bag until it's totally cool or condensation will occur and it will ruin the granola. This keeps for a long time on the shelf. I've not found out how long because the family gobbles it down within a few days at most.


Homemade Frugal Delicious Stovetop Granola


4 T Olive Oil


8 Cups Oats


A bag of coconut


1 1/3 Cup butter


8 T Honey


1 1/3 Cup packed brown sugar


Up to 2 cups Nuts (if desired) (toasted if desired)


Up to 1 1/3 cup dried fruit of your choice


Heat the oil in the biggest pot you've got over medium high. Add oats and coconut. Stirring constantly until browned. This will take several minutes. Set aside in a bowl.


Heat a bit more oil and toast any nuts you want to toast. Set them aside separately.


Melt butter. Add honey and then brown sugar. Stir constantly until you've got a good bubble.


Add toasted oats and coconut back to butter/sugar mixture and toast several minutes until the mixture gets all toasty and caramely.


Pour mixture on parchment or waxed paper. Pack down. Add nuts, pack down. Add dried fruits, pack down. Once it begins to harden, break up into big chunks.


When totally cool put into a huge zipper bag (or two).


Enjoy!

For more "Works For Me Wednesday" Tips, be sure to visit http://rocksinmydryer.typepad.com/shannon/!

Read More...

Friday, November 16, 2007

Frugal Friday - Yogurt


I read a story a long time ago about a family that wanted to put a house somewhere, but they needed a source of water there. They immediately thought of a well. They went to considerable trouble and expense trying to get a well on their property. And then found out that they couldn't for whatever reason. It simply wasn't possible. They were devastated. And almost didn't build on the property at all. Then someone in the family realized that they didn't NEED a well. They needed water. And with that simple realization, they found an alternate way to get water there (which I don't remember...and I've probably butchered the story anyway, but you get the point)

This post today is specifically about how I make my own homemade, frugal yogurt. But it's generally about something more broad. I found a long time ago that many of the things I buy at the store are things that I can duplicate at home with little to no trouble. And usually for much less cost. It just takes some looking around.

As an example, I can remember a time when I made a special trip to the grocery store to buy a single pack of taco seasoning for dinner that night. I have always had a huge cabinet full of various spices, but never knew that you can throw a few together and make your own taco seasoning for pennies. What a waste!

The thing is, I didn't need a taco pack. I needed a seasoning on the meat that would taste similar to a taco pack.

Simple but profound difference.

So with that said, let's get to the yogurt. A few years back I would have never *thought* of making yogurt. But it's no secret that I like to have things well stocked, but with much variety. And I like paying the least I can pay for the quality I want. Like most of us do!

Homemade yogurt is really simple (even without a yogurt maker- this is actually the first time I'd ever used one!). I start with a quart of store bought, plain, whole fat, yogurt. (I like to get organic when possible, but it's really hard to find here most of the time.) I take out appr. 3 tablespoons and put that into a bowl. The rest I freeze in an old ice cube tray. Whenever I need to make homemade yogurt again, I can pop out 3 of the cubes and have the perfect amount of yogurt "starter".

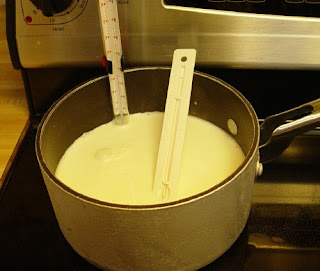
Next I heat 4 cups of whole milk (this I *can* find organic) on the stove top. Using a candy thermometer, I heat to 180 degrees.

Once it reaches 180F, I pull it off the heat and allow it to cool to 115F. Here I was testing the new spoon thermometer that I got with the frugal yogurt maker and it worked perfectly!

When it reaches 115F, I skim off the top layer of "skin" that is on the milk and discard it. Then I take about half a cup of the milk and stir it into the 3 tablespoons of store bought yogurt (which is your "starter") to temper it.

Then this starter mixture goes back in the pot and is mixed well.

This I pour into the glasses that came with the yogurt maker.*
I incubate for 8 to 10 hours.

And this is what I end up with! (Which is to be refrigerated right away, of course.)
*As I mentioned earlier, this is the first time I'd ever used a yogurt maker. I made it many, many times before I found this yogurt maker at a terrific price. The goal is to simply keep the freshly mixed yogurt a pretty constant temperature of around 110-115F for several hours.

There are many different ways to do this, but the way that was the easiest to me was with a cooler and a heating pad. I put the heating pad on low** in the bottom of the cooler and laid a towel on top if it. Then I set the yogurt on top of the towel (I used a quart mason jar, with lid) and kinda wrapped the towel around the yogurt. The top of the cooler was then closed AND LEFT CLOSED for at least 5-6 hours. Sometimes it would take just 5 hours and sometimes up to 8 or 9. I would check by tilting the jar and once "soft set" it's done and I refrigerated right away.

**(Heating pad temperatures may vary. When I changed heating pads I had a batch of yogurt that took a long time to set up. I learned with any changes to always check the temperature of the cooler/heating pad "incubator" with a candy thermometer by laying it on the towel for several minutes and adjusting the heating pad to get the temperature at a pretty stable 115F)

***As an aside, I've read that you can make yogurt from any kind of milk (even reconstituted powdered), though I've never tried it.

A quart of organic yogurt here can run as much as $4 or more. One quart will make ten or more quarts of homemade yogurt. So at most I use 40¢ worth of organic yogurt as "starter". I can get a quart of organic milk for $1.50. Adding 10¢ for electricity, I can make my own whole fat, organic yogurt for half the price I can buy it at the store. Plus, I can have it without going to the store. Which is another huge bonus for me.

I am posting this for my own information, not as any how-to guide. Though I have made it for months now, I am no expert. There are many, many places on the web that you can find information on making yogurt at home. I suggest that you check out them out before trying to make yogurt on your own.

I got my recipe here.

For more frugal inspiration, be sure to check out Frugal Friday hosted by Biblical Womanhood.

Read More...